US 207-200-1920


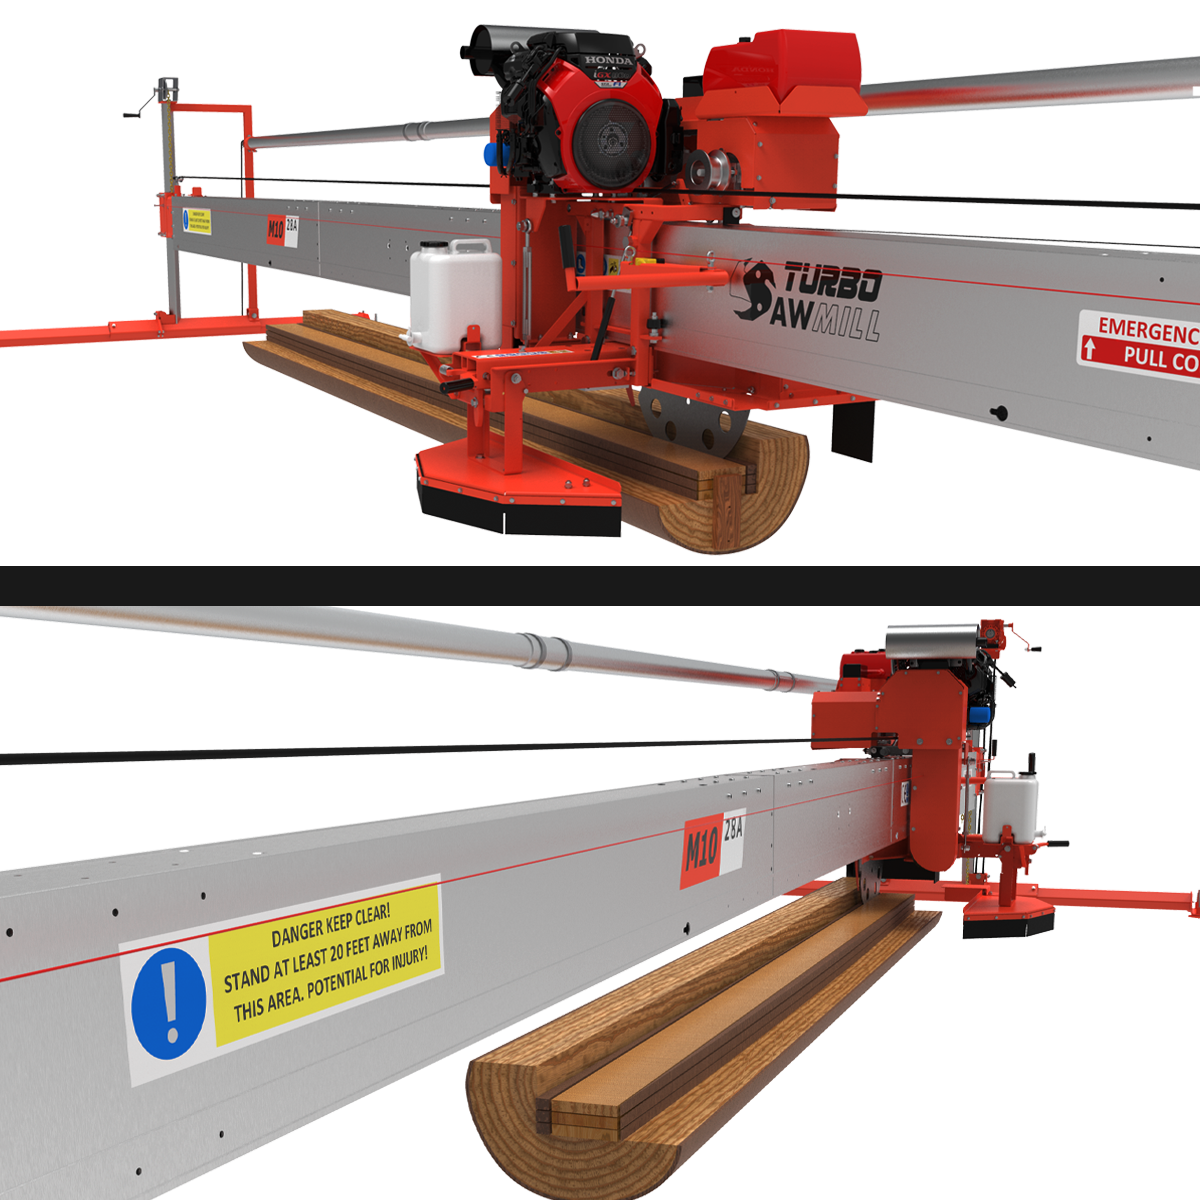
Swing-blade Sawmill Operation
Adjusting Your Sawmill
Learn how to correctly adjust and maintain your portable circular sawmill for accurate cuts, maximum efficiency, and consistent performance.
Open the Log & Skim the Face
Start with a large-diameter log and remove the top face using shallow, controlled cuts to prevent blade overheating, ensuring water flow is active. Lower the mill approximately 3 mm and make a series of 2" horizontal skim cuts across the log face to create a perfectly flat reference surface. Switch off the mill, remove the guard, and reposition the horizontally flat blade to the center of the log face, ready for accurate, consistent milling.
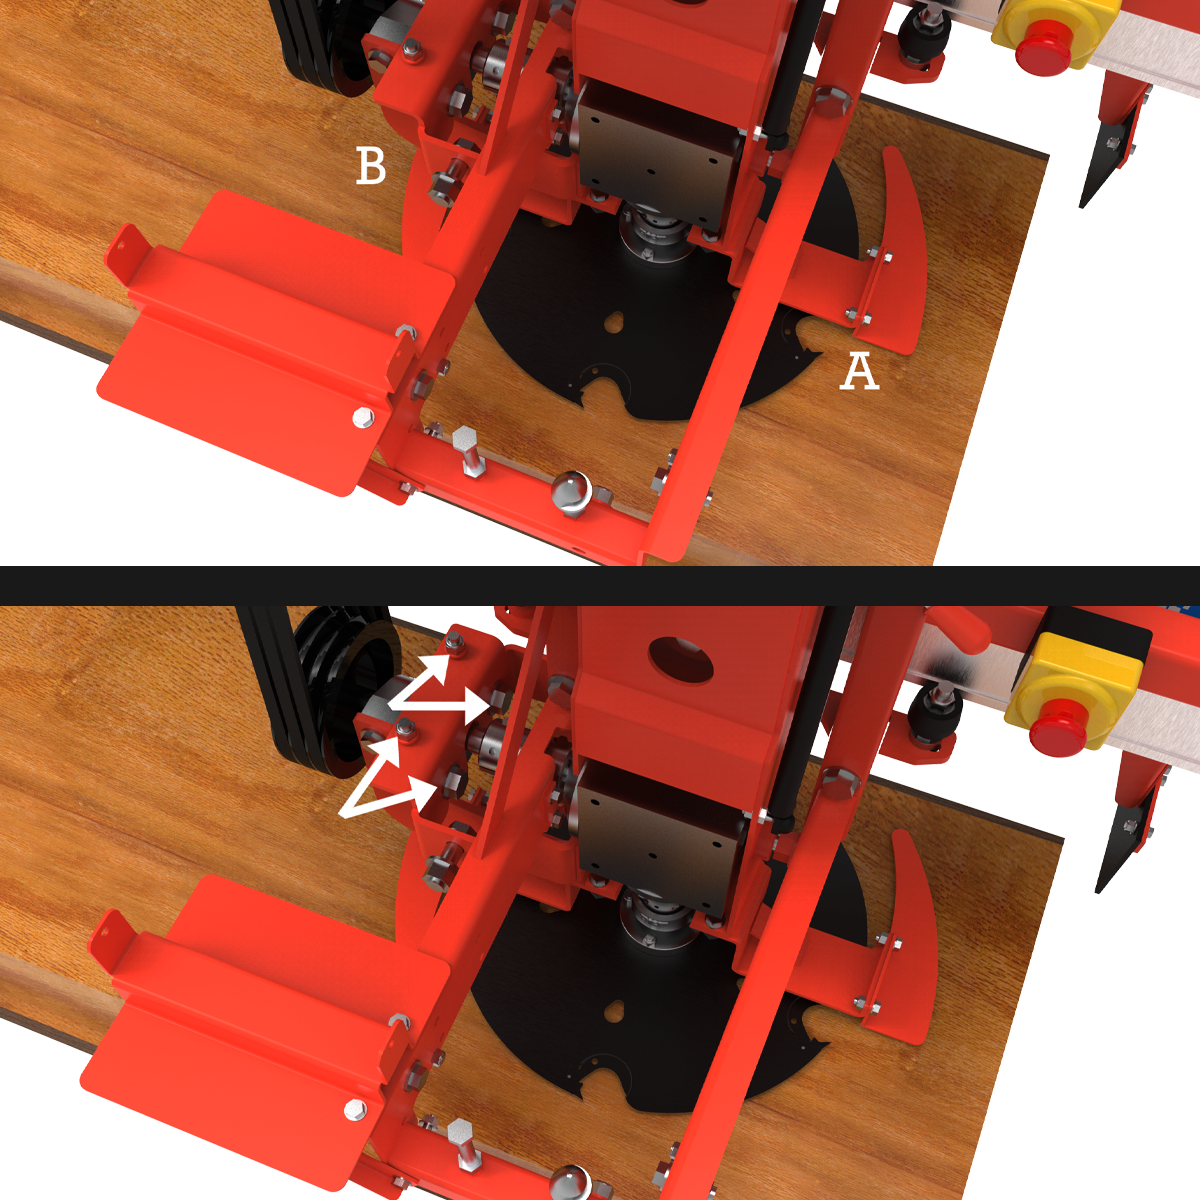
Adjustment 1 – Horizontal Criss-Cross Alignment
Set horizontal accuracy by comparing the tooth-to-slab gap at Position A and Position B. These gaps must be equal by eye and within 0.25 mm (≈ 0.010 in, ~1/64") of each other. Loosen the main M16 (≈ 5/8") bearing bolts and adjust using the M10 (≈ 3/8") setscrews, raising or lowering the bearing within the slotted mount—moving the bearing up raises Position B; moving it down lowers Position B. Once aligned, fully lock the bolts.
Tip: Hold the bearing-side nut with an open spanner and turn the inner bolt using a 24 mm (≈ 15/16") socket or ring spanner for controlled adjustment.
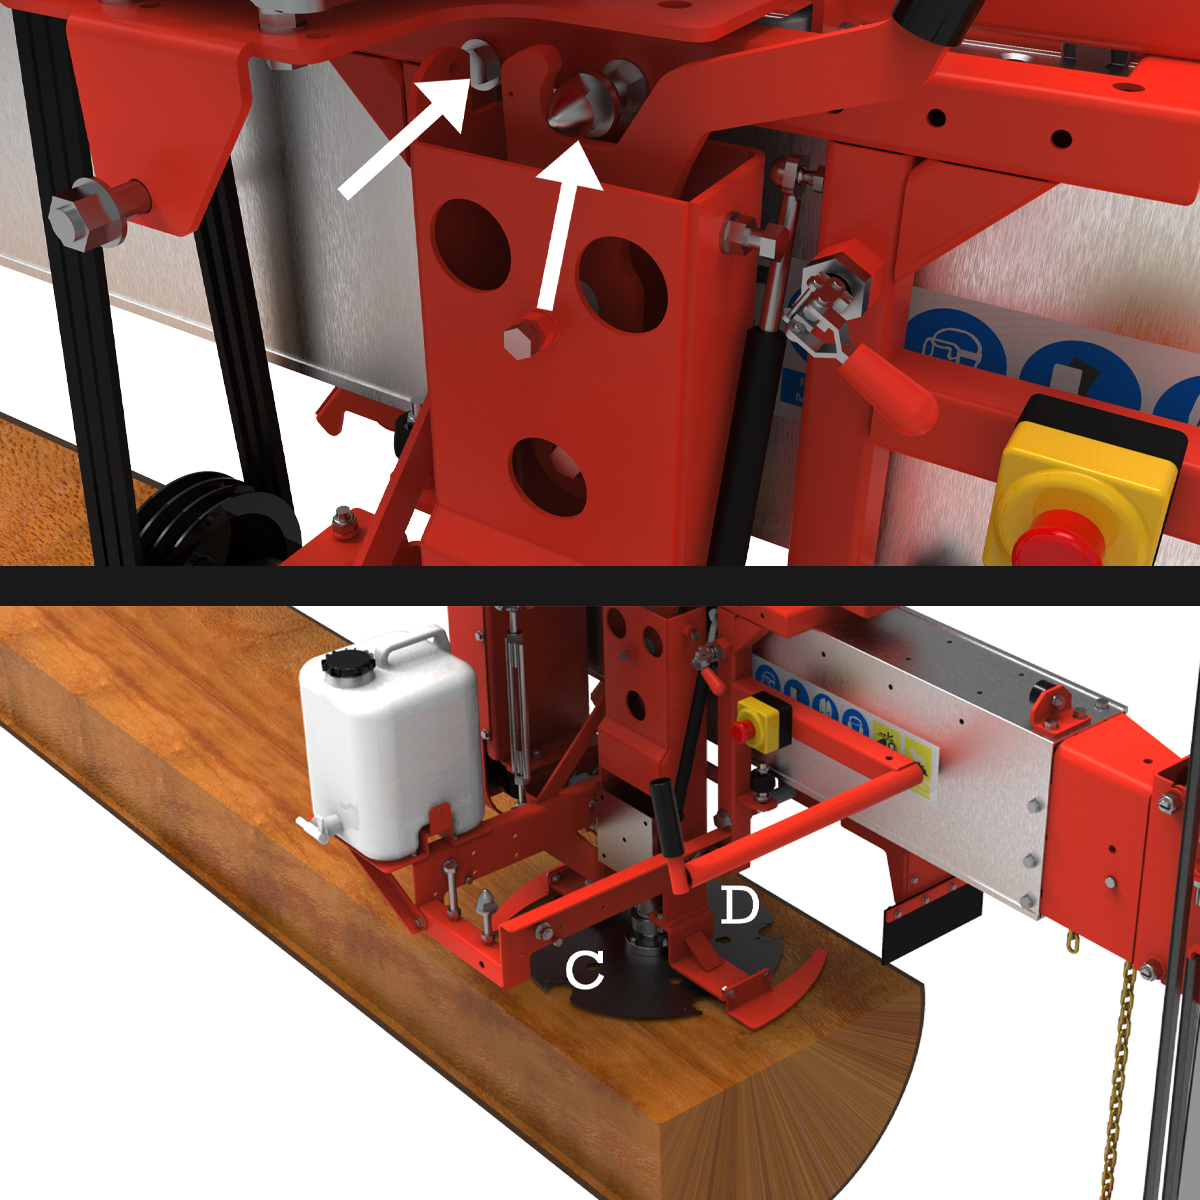
Adjustment 2 – Horizontal Lead-In
Set the lead-in by comparing the tooth-to-slab gap at Position C and Position D. At Position D, the tooth should be just scraping the slab face. At Position C, there should be a 2–4 mm gap (≈ 5/64"–5/32") between the tooth and the slab.
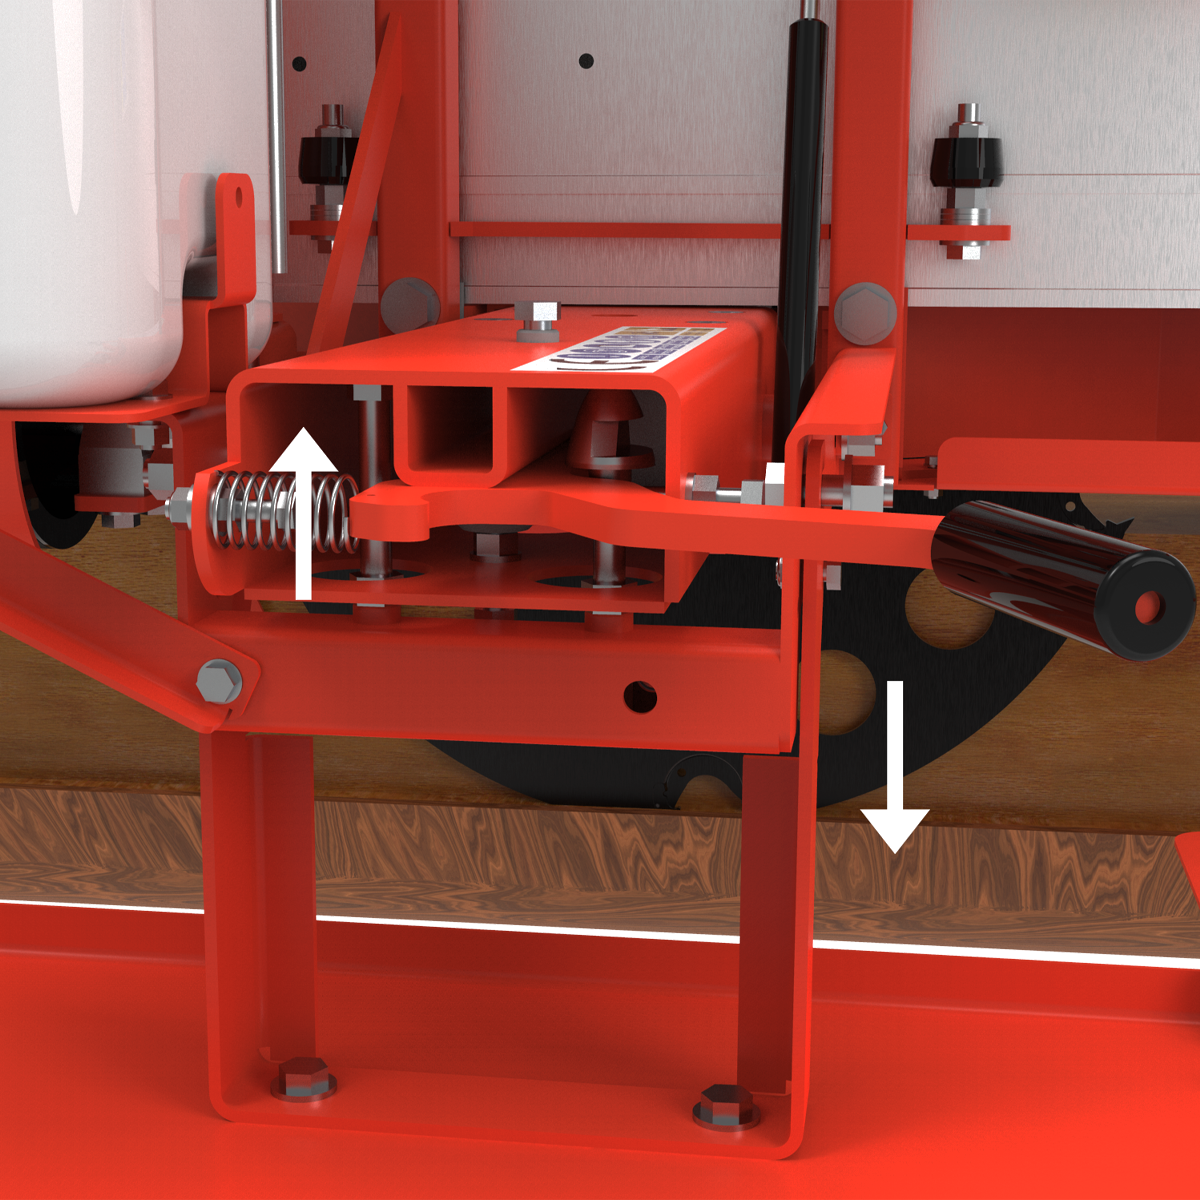
Adjust by adding or removing washers, or by turning the hex nut behind the M12 (≈ 1/2") set screw located next to the cone—this is the swing-stopper bolt. To increase the gap at Position C, screw the M12 (≈ 1/2") stopper set screw in.
Once set, re-adjust the cone lock next to the stopper set screw so the swing arm is fully locked with no free movement.
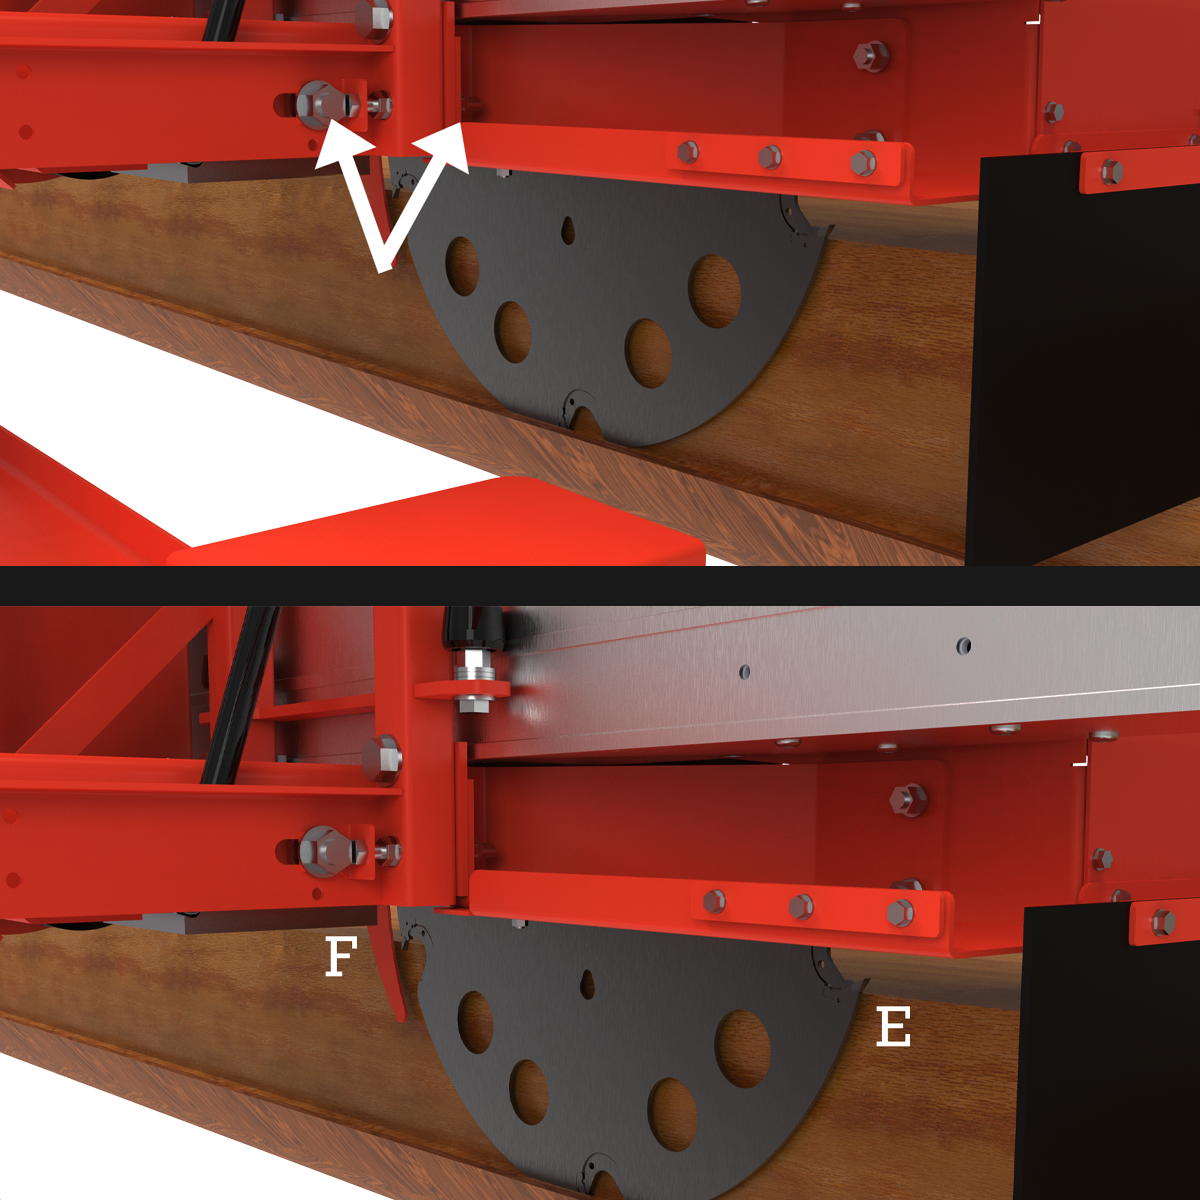
Adjustment 3 – Vertical Criss-Cross Alignment
Make a deep cut on the far-left edge of the log, ensuring water is flowing to the blade. If the mill is significantly out of adjustment, you may need to lightly re-skim this face at a very slow feed rate to establish a true reference surface. Once complete, position the vertical blade alongside the freshly cut face.
Check the tooth-to-slab gap at Position E and Position F. These gaps must be equal by eye and within 0.25 mm (≈ 0.010 in, ~1/64") of each other.
Loosen the single large M16 (≈ 5/8") nut. Adjust using the M10 (≈ 3/8") set screw by shifting the axis bush and M16 nut left or right within the slot—moving left shifts Position E left; moving right shifts Position E right. Once aligned, fully lock the nut and bolts.
Adjustment 4 – Vertical Intersect
This is the final and simplest adjustment. Make a test cut and check that the vertical and horizontal cuts intersect correctly and that the board releases cleanly.
If the cuts do not fully intersect and the board does not release, raise the long M12 (≈ 1/2") stopper set screw by a few millimetres, then re-adjust the cone to secure the lock. This action lowers the blade so the cuts connect.
If the boards are releasing but vertical cuts are leaving witness lines on the slab face, lower the long set screw and locking cone instead. This raises the blade slightly off the slab face and removes the marking.
Adjustment amount should match how far the blade is out—typically only 1–3 mm (≈ 1/32"–1/8") is required. To confirm correct intersect, skim the top face of the log, swing into vertical, push back over the slab, and position the tooth as close to the slab face as possible. A correct intersect will show a gap of approximately 3 mm (≈ 1/8") from the bottom tooth to the top slab face.


Understanding Swing-Blade Sawing Methods: Quarter Sawing vs Flat Sawing
Swing-blade sawmills operate differently from bandsaw and circular mills, so understanding the core sawing methods is essential for achieving the best results.
With a swing-blade sawmill, the log remains stationary. Instead of rotating the log, the mill works progressively through it in its natural position. This greatly reduces log handling and allows internal stresses to be released gradually as the log is opened, rather than after it has been fully broken down.
There are two primary cutting methods used with a swing-blade sawmill: quarter sawing and flat sawing.
Quarter sawing involves cutting boards vertically toward and around the heart of the log. This method produces timber with excellent structural stability, straight grain, and strong load-bearing characteristics. A common trait of quarter-sawn boards is that they may crook as they come off the log, which can require additional straightening later.
Flat sawing involves cutting boards horizontally around the heart of the log. This method typically produces very straight beams directly off the mill, making it ideal for posts, beams, and framing. While flat-sawn boards are easy to process initially, they are more prone to cupping and movement during drying compared to quarter-sawn timber.
Knowing when to use quarter sawing versus flat sawing allows you to optimise your swing-blade milling strategy, control timber movement, and select the most effective cutting method for your log size, timber species, and intended end use.
Resawing
Resawing is where automated swing-blade sawmills really excel. Waney, bowed, or crooked boards can be efficiently re-sawn—provided they were initially oversized. Side off-cuts generated during resawing are ideal for fillets, making excellent use of what would otherwise be waste timber.
Stack and stage boards close to the mill so they’re ready for resawing when required.
When resawing, leave a half-cut, stable log on the mill with one clean side edge intact, as shown in the diagram. Place the crooked or waney board with its concave face tight against the log’s side edge. With the blade in the vertical position, feed the saw forward, away from the operator, on each side of the board. This controlled forward feed pushes the board into the log face, eliminating movement and producing a perfectly straight-edged result.
For very light timbers, add a simple safety stop at the operator’s end of the log. A small timber lip—approximately 1 inch high—screwed in front of the boards prevents any chance of material ejecting toward the operator.
This resawing method is especially valuable when processing high-stress species such as eucalyptus, where it is often the only practical way to recover straight, high-quality timber from difficult logs.
Bunks
Proper bunk setup is critical for accurate swing-blade sawmilling. Bunks prevent logs from sagging as material is removed, which directly affects timber sizing, straightness, and overall cut quality. For best results, use a minimum of three bunks, with wedges positioned at the center to fully support the log throughout the cut. Poor log support will introduce movement and distortion, leading to inconsistent board dimensions.
Working with a swing-blade sawmill does not require steel bunks or log dogs—in fact, swing-blade mills perform best without them. Timber bunks are the preferred solution, as they allow you to mill right down to the final board without the risk of striking steel, protecting both the blade and the mill.
A well-designed bunk layout is critical for accuracy, safety, and timber quality. Three bunks are ideal, as this prevents log sag when milling toward the bottom of the log. Log sag is one of the most common causes of thick-and-thin boards, and the third bunk largely eliminates this issue.
The recommended setup uses two main bunks with a smaller central bunk, combined with opposing wedges at the centre. These wedges can be driven against each other to provide fine vertical support, keeping the log fully supported as weight is removed.
Square cut-outs in the bunks work well to cradle the log and prevent movement. For additional stability, it’s recommended to raise the right-hand edge of the bunk slightly to support the rear of the log. When cutting large vertical decks, the log’s weight naturally shifts to the right as boards are removed. Without this support, logs often roll roughly two-thirds of the way through the cut. Raised right-side edges significantly reduce this problem.
For sizing:
-
7-inch square cut-outs are suitable for logs up to 20 inches in diameter
-
8–9 inch square cut-outs are recommended for larger logs
Keep the operator walking area clear of bunks, off-cuts, and debris. Stepping over obstacles increases fatigue and safety risk during milling.
It’s also important to leave some side material intact while milling the final boards. This retained strength helps prevent log deformation as internal stresses are released.
In addition to the bunk structure, small timber wedges can be used for extra support. These can be removed from the sawn side as required, allowing you to mill cleanly right down to the last board.
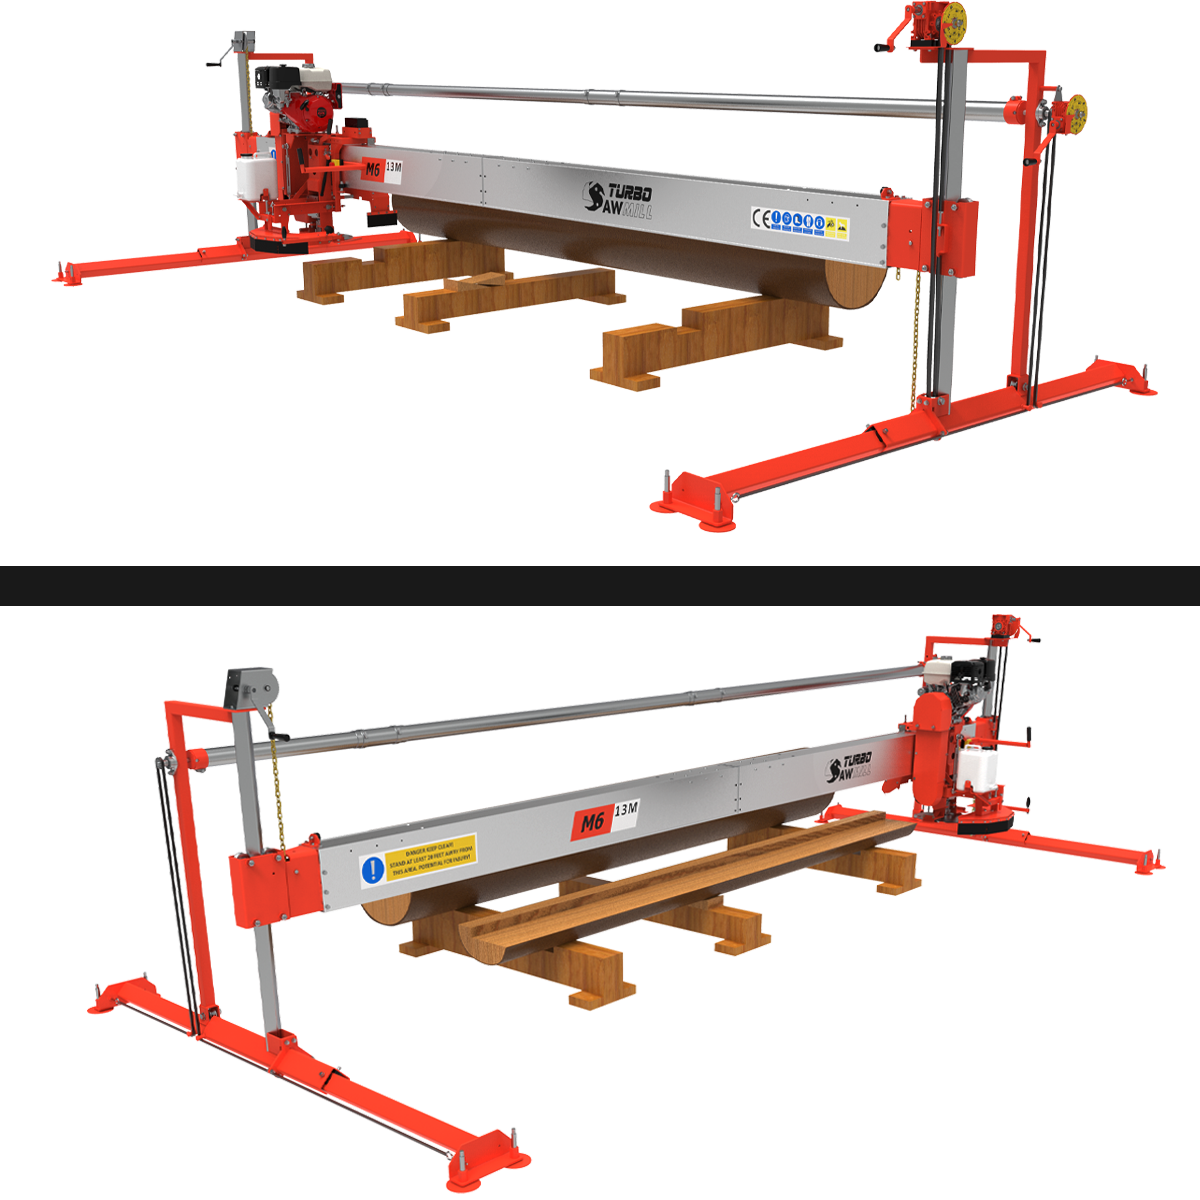
This bunk system works effectively with all swing-blade sawmill models. Bunk spacing should simply be adjusted to suit your working length and log size.
Horizontal Bounce – Understanding and Controlling Horizontal Cuts on a Swing-Blade Sawmill
Horizontal bounce is a normal consideration when sawing wide boards on any swing-blade sawmill, regardless of manufacturer. Turbosawmill beams are engineered to be as strong as practically possible while remaining lightweight and manageable, with maximum rigidity designed into the vertical cutting plane. Vertical cuts are typically made in a single, full-depth pass, with the blade running close to the deepest and strongest section of the beam.
During horizontal cutting, the blade is positioned further away from the beam and aligned toward the narrower beam section. As a result, horizontal cuts naturally have less structural support than vertical cuts. For this reason, it is standard swing-blade practice to make two passes when cutting wider horizontal boards.
Manual Swing-Blade Sawmills – Reducing Horizontal Bounce
With manual mills, horizontal bounce is controlled by managing entry depth and stabilising the blade:
-
Start with a shallow entry cut. In hardwood, this may be limited to around 2 inches before bounce occurs.
-
Set the sizer to the kerf mark, then wind over two handle rotations.
-
Perform the initial cut, then return the saw through the cut zone.
-
Actuate to the final board depth (typically 2–6 inches, depending on timber size and density).
-
Once entering the deeper cut, slide the side roller on the horizontal guard against the board face and lock the star knob. This stabilises the blade for the remainder of the cut.
This process can be repeated for each board of the same size without resetting the roller.
Full-depth horizontal cuts are possible using the side roller alone, but if carriage flex is encountered, reducing the initial cut depth will always produce better results.
Automated Swing-Blade Sawmills – The Bridge Cut Method
Automated Turbosawmill models simplify horizontal cutting and virtually eliminate bounce:
-
Set the sizer to the kerf mark and wind over two handle rotations.
-
Power the blade down through the log.
-
Pause just before the blade exits the far end.
-
Wind over an additional 2–5 inches, depending on model, board size, and timber density (within riving knife limits).
-
Return the saw while cutting toward the operator (climb sawing).
Because the blade is pushing the cut away from the beam, bounce is eliminated. This technique—known as the bridge cut—allows fast, stable, and accurate horizontal sawing. Once returned, set the final depth and complete the cut. It is a highly productive and repeatable system for wide boards.
Increasing Horizontal Cutting Capacity
To safely increase the depth of the first horizontal cut on both manual and automated swing-blade mills, we recommend:
-
Ensuring all four primary mill adjustments are correctly set
-
Using narrow tips and shanks to reduce cutting load
-
Adding 10–15 kg (22–33 lb) of weight to the horizontal guard
-
Installing the board return and using it as a stabiliser for full-depth cuts
-
Fitting the centre leg for maximum beam stability
By understanding beam dynamics and applying the correct cutting technique, horizontal bounce can be effectively managed—allowing wide, accurate, and repeatable horizontal cuts on all Turbosawmill swing-blade sawmills.
Blade Cost and Maintenance – Why Swing-Blade Sawmills Are So Economical
Turbosawmill swing-blade sawmills are designed to deliver exceptionally low blade running costs with minimal downtime. Every Turbosawmill is now supplied as standard with insert-style circular blades, allowing teeth to be changed in around five minutes without removing the blade.
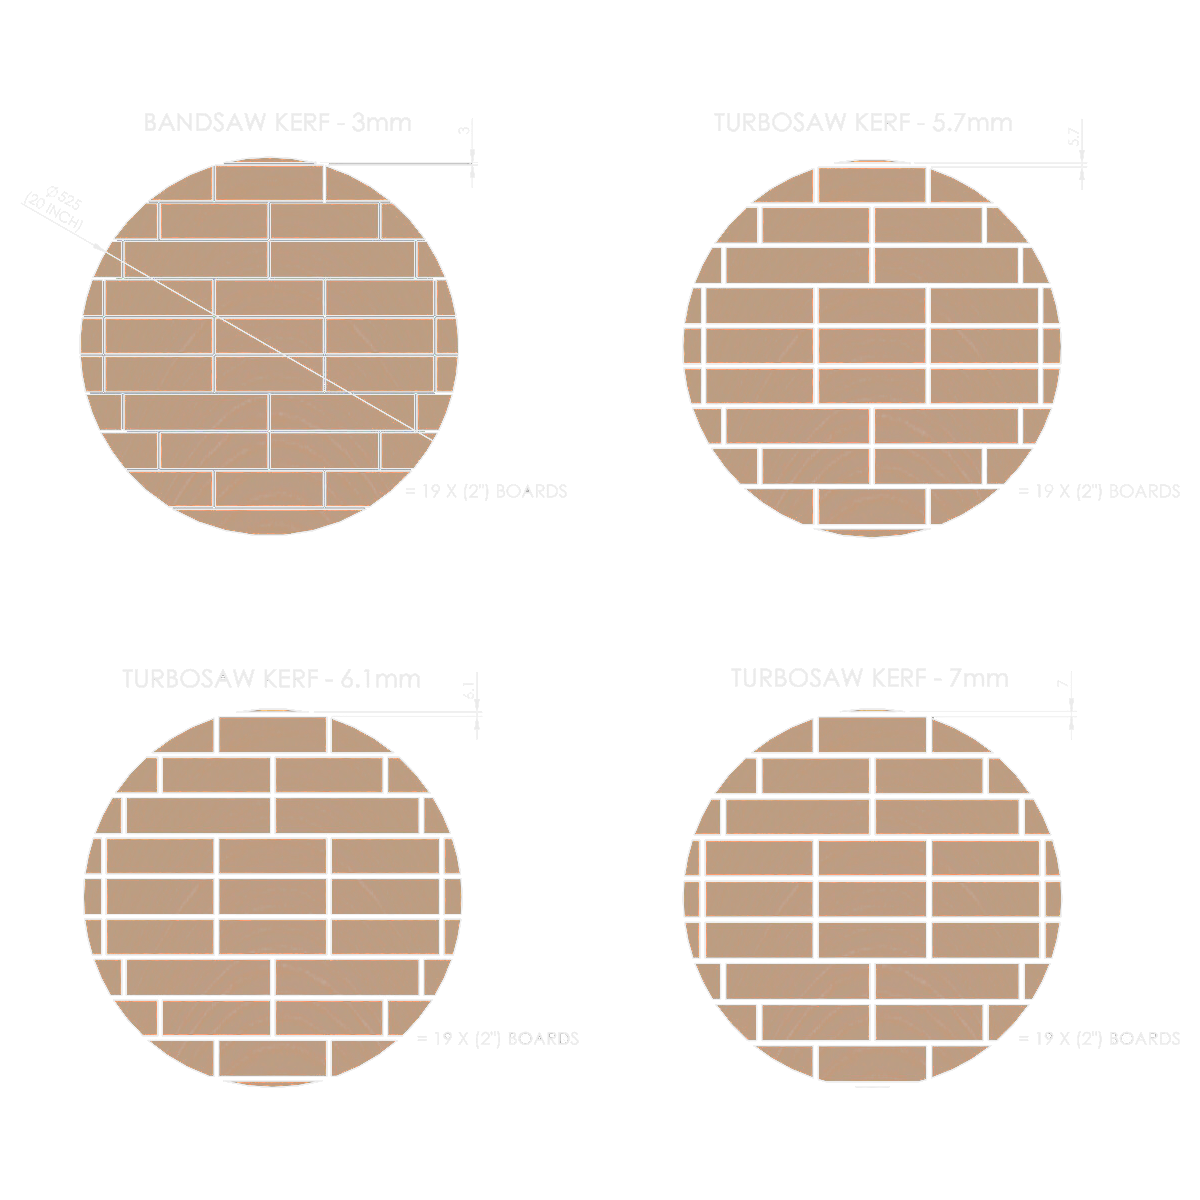
For added safety, Turbosawmill blades also feature a patent-pending locking screw system, ensuring each insert tooth is positively retained during operation. The teeth are precision-ground to provide narrow kerf options, improving timber recovery and reducing waste.
Swing-Blade Maintenance Costs
One of the biggest advantages of a swing-blade sawmill is the very low ongoing blade maintenance cost. Swing blades are simple to sharpen, highly durable, and extremely economical over high production volumes.
Typical blade performance:
-
Five insert teeth per blade
-
Sharpening time: approximately 60 seconds
-
Sharpening interval: every 2–4 cubic meters (≈ 844–1,688 board feet)
-
Sharpen life: around 10–20 sharpening's per tooth set
This equates to up to 80 cubic meters (≈ 33,760 board feet) of sawn timber from a single set of teeth.
Replacement cost:
-
Approximately $7.5 USD per tooth
-
$37.5 USD total for a complete five-tooth set
That works out to an estimated running cost of around $2 USD per cubic meter (≈ 422 board feet) of sawn timber—one of the lowest blade costs in the timber industry.
Band Blade Cost Comparison
By comparison, band sawmill blades have significantly higher ongoing costs:
-
Narrow band blades are typically run for no more than 40–60 minutes to maintain cut quality
-
Each band blade generally allows 4–6 sharpening's before being discarded
-
Sharpening requires higher skill levels and typically takes 3–10 minutes
-
Band blade costs commonly range from $25–$50 USD per blade
Assuming a production rate of approximately 0.5 cubic meters (≈ 211 board feet) per 40-minute run, the effective blade cost equates to $17 USD per cubic meter (≈ 422 board feet), depending on blade price and sharpening life.
The Swing-Blade Advantage
When comparing blade cost, sharpening time, and overall durability, swing-blade sawmills offer a dramatic reduction in consumable costs. Combined with fast on-site sharpening, narrow kerf cutting, and long tooth life, Turbosawmill swing-blade systems remain one of the most cost-effective timber sawing solutions available for both portable and commercial operations.
Swing-Blade Simplicity in Operation
Swing-blade sawmills are renowned for their simple, intuitive operation and unmatched versatility. Instead of forcing the log to suit the mill, the swing-blade allows you to work progressively from the top of the log downward, selectively choosing timber sizes while naturally working around knots, sweep, and defects.
This method gives the sawyer full control over board size, grain orientation, and recovery, with minimal log handling and maximum efficiency.
Below is a step-by-step example illustrating the typical cutting sequence and movements of a swing-blade sawmill.
Step-by-Step Swing-Blade Sawing Process
1. Quarter and Flat Sawing Principles
Quarter sawing and flat sawing follow the same core principle: each board is removed in relation to the heart of the log, allowing stress to be managed gradually and timber quality to be maximised.
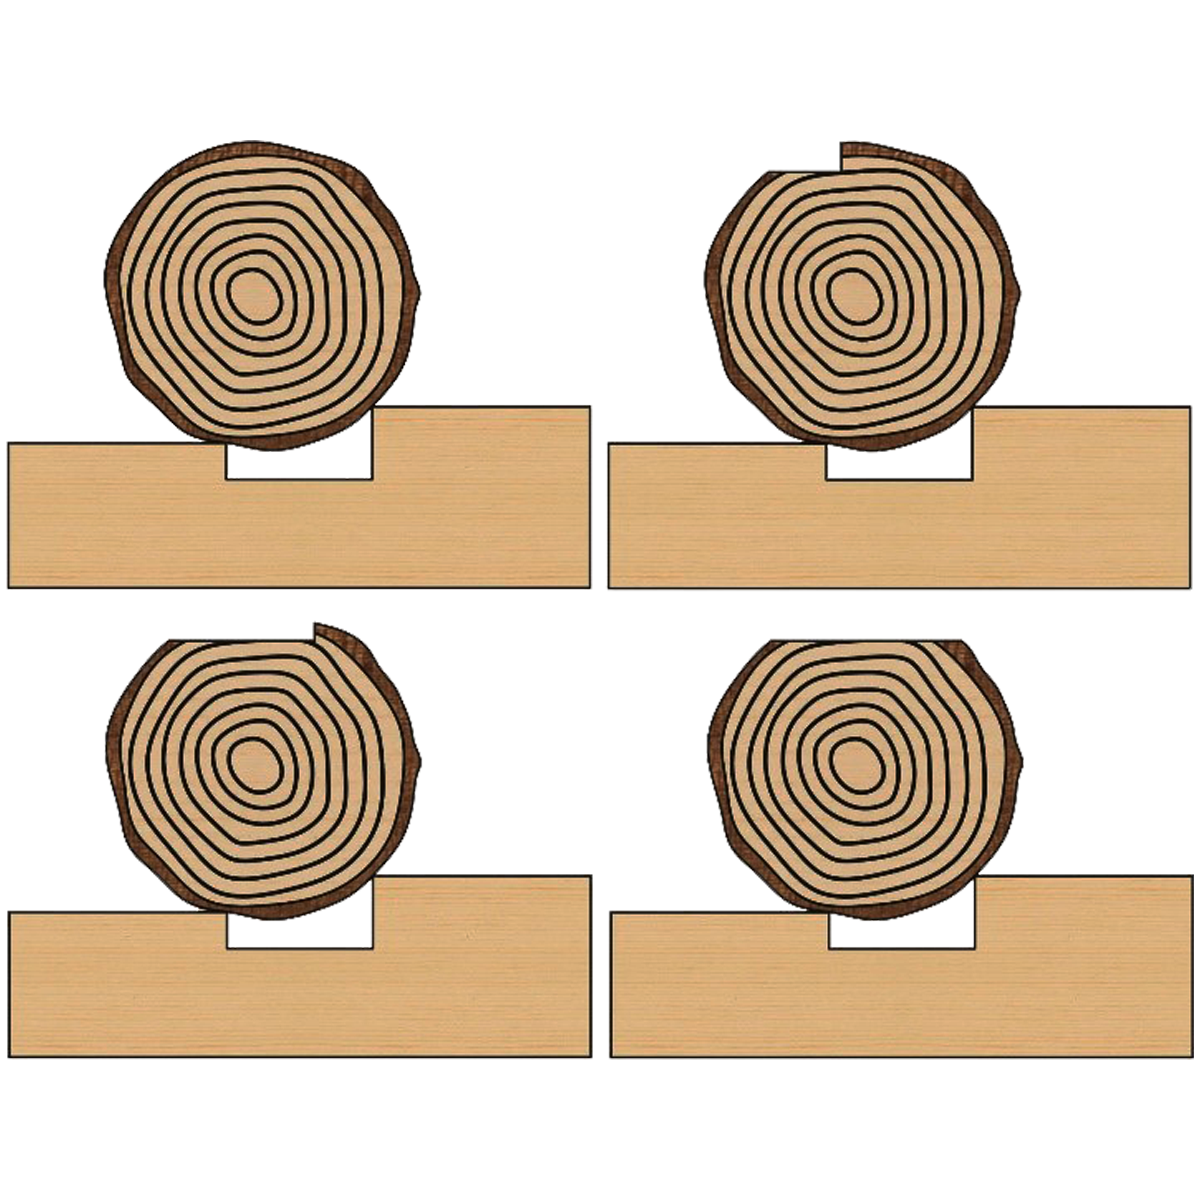
2. Opening the Log Face
The top face of the log is removed section by section using a combination of horizontal and vertical cuts. Once a sufficiently wide, flat face is established, the saw head is lowered. In this example, the drop is 2 inches.
3. First Horizontal Board
A 2" × 8" board is cut in the horizontal position.
4. Wide Horizontal Cuts
Wide horizontal boards are typically taken in two passes (for example, 4" + 4" to achieve an 8" wide board). This is standard swing-blade practice and ensures accuracy and stability.
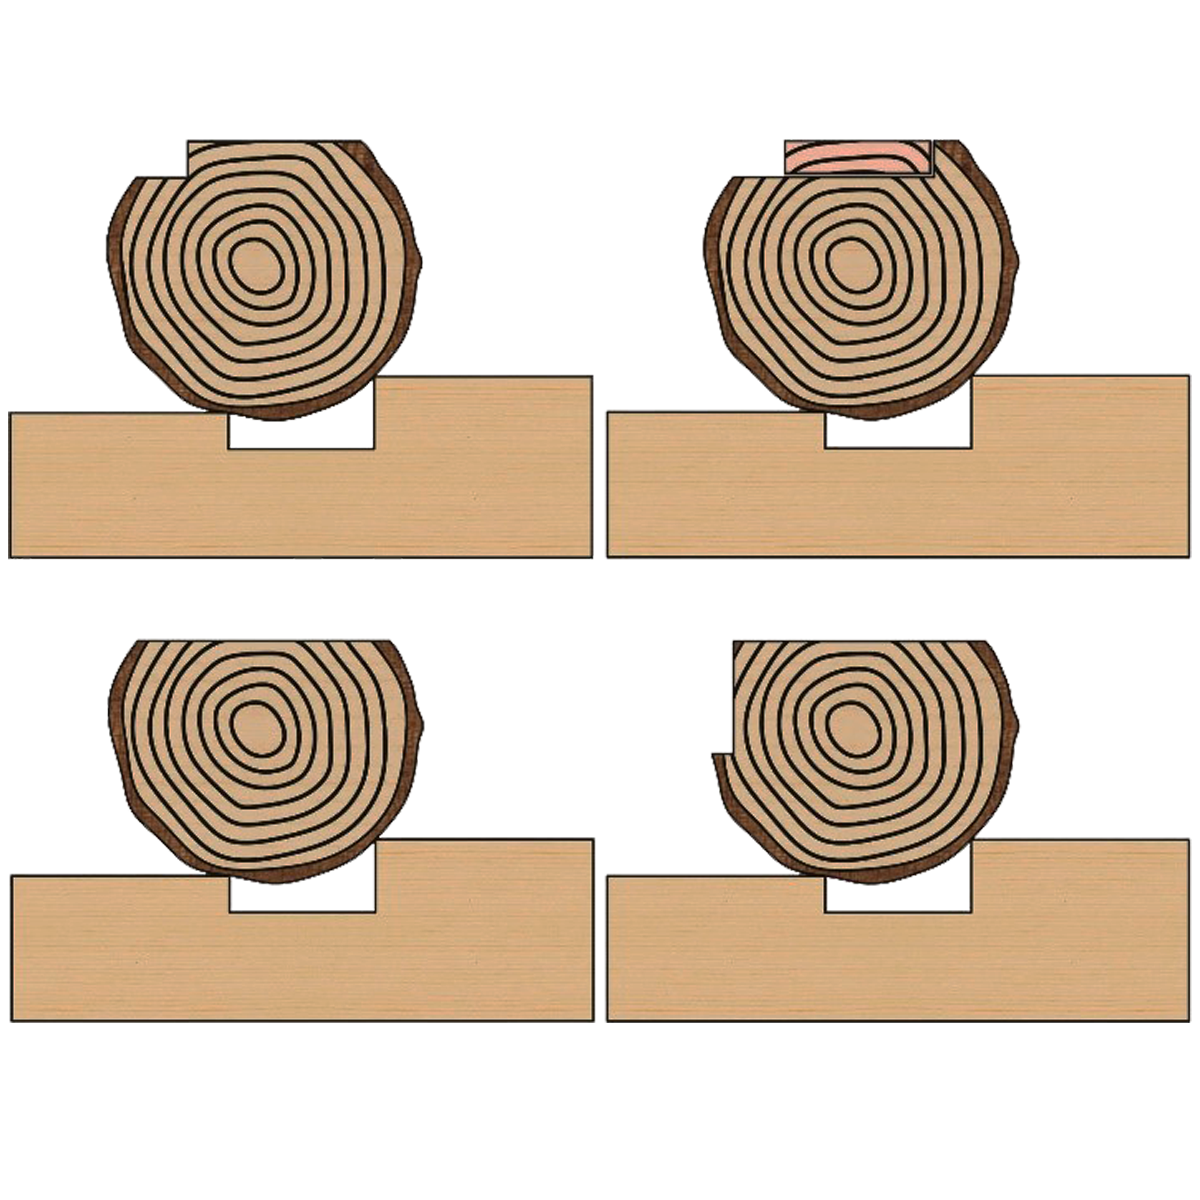
5. Dropping Down for Structural Timber
The saw head is lowered 6 inches, and a combination of vertical and horizontal cuts is made to recover:
-
1 × 6" × 6" beam
-
3 × 2" × 6" boards
-
1 × 1" × 6" board
6. Double-Width Horizontal Cut
The saw head is lowered another 2 inches to remove a 16-inch wide double cut. The horizontal guard is pivoted out of the way so the left side of the blade can cut on the right side of the log.
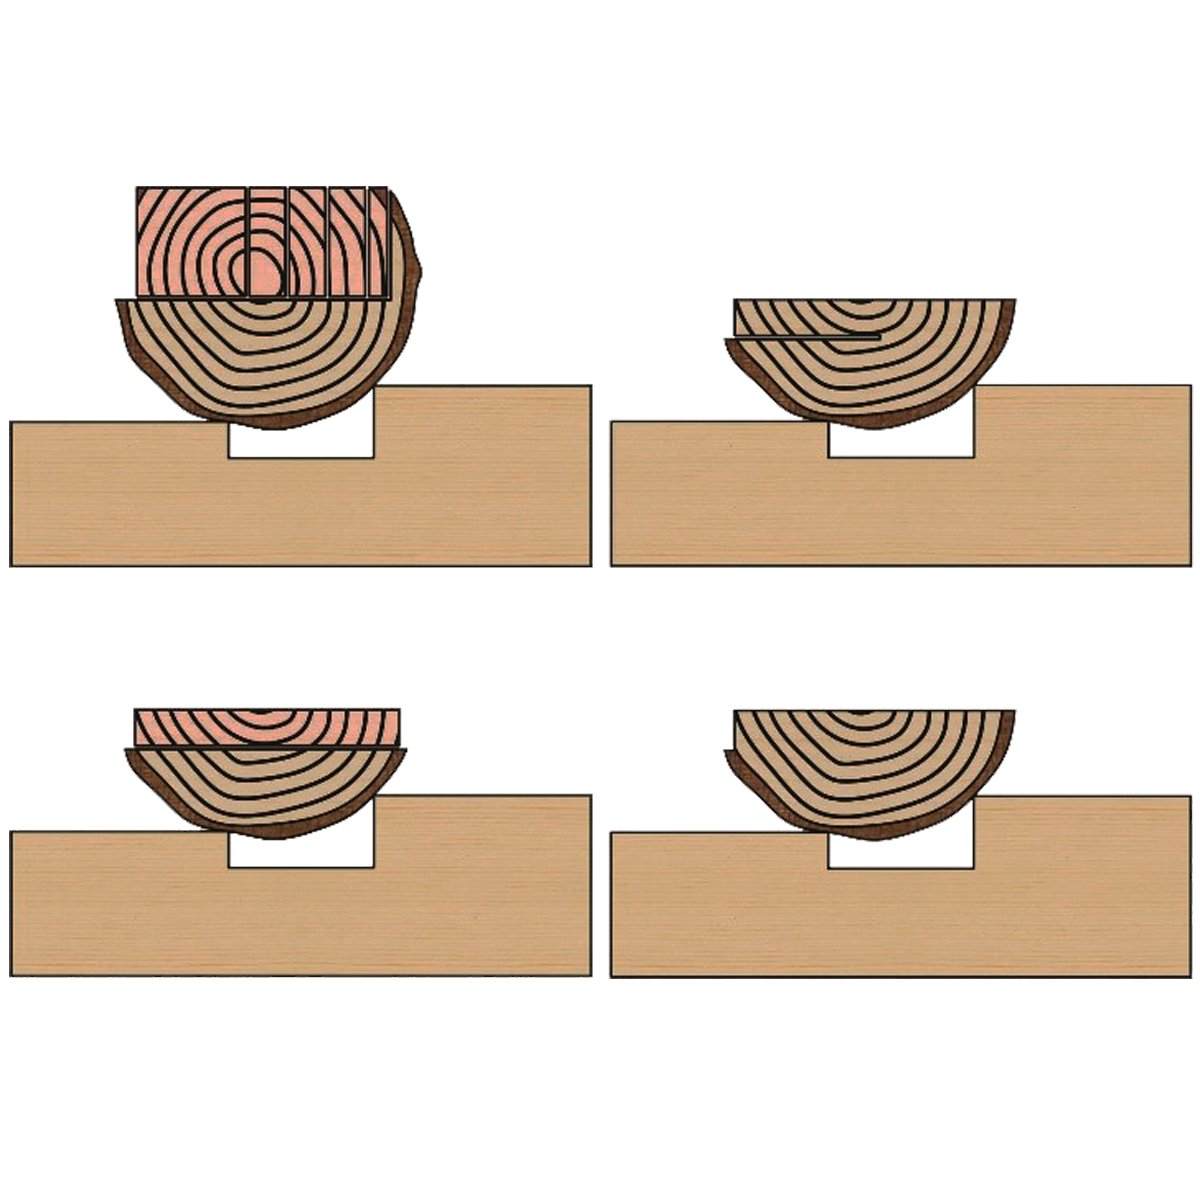
7. Final Intermediate Boards
After dropping the saw another 2 inches, the following boards are recovered:
-
1 × 2" × 4" board
-
1 × 2" × 8" board
Tip: It’s best to leave the right edge of the log intact during this stage. Retaining side strength helps prevent log sag as you approach the final cuts.
8. Final Board and Clean Recovery
The final board is removed, leaving minimal waste. When cutting the last few boards:
-
Take horizontal cuts in smaller increments to prevent slab movement
-
Ensure bunks are correctly positioned for maximum log support
Why Swing-Blade Sawmilling Works So Well
This progressive, top-down cutting method is what makes swing-blade sawmills so effective. By maintaining log stability, controlling stress release, and allowing flexible board selection, swing-blade systems deliver exceptional recovery, accuracy, and ease of use—all with minimal setup and handling.
Swing-blade simplicity isn’t just about fewer steps; it’s about smarter timber recovery from every log.